Online:Fort Sphinxmoth
< Elder Scrolls Online: Places: Reaper's March / Ruins / Quest Hubs(Redirected from Online:Fort Sphinxmoth Wayshrine)
|
||||
|---|---|---|---|---|
| Quest Hub | ||||
| Discoverable | Yes | |||
| Completion | Objective | |||
| Skyshards | 1 | |||
| Occupants | ||||
| Accalia, Darius, Engannas, Marcus Bandit Blademaster, Bandit Butcher, Bandit Marksman, Bandit Mender, Crocodile |
||||
| Zone | ||||
| Dawnmead, Reaper's March | ||||
| Location | ||||
| North of Dune | ||||
| Loading Screen | ||||
|
Built by the Second Empire to house a garrison of Border Scouts, Sphinxmoth was placed between feuding tribes of Bosmer and Khajiiti in an attempt to stop their cross-border raiding. When the Empire fell, the fort's garrison was replaced by the very raiders it was built to control.
|
||||

Fort Sphinxmoth is a ruin in northeastern Reaper's March, north of Dune.
This long-abandoned Imperial Legion fort is now inhabited by the eponymous Sphinxmoth Bandits, who have recently returned from their raid on the Temple of Mara in Bravil to stash the relics they stole. They were followed by temple guardians, who are intent on acquiring back the relics.
A book titled The Fort Sphinxmoth Ruins is located beside a skeletal corpse beneath a collapsed tent in front of the cave leading into the fort. An Unexpected Defense is sat atop a large stone brick in front of the door leading into the fort.
Grey imps can be found west of the fort. The Dawnmead Dolmen lies down the road heading west from the fort. If you follow the road leading southwest and look west in the middle of the road, you'll find a field full of Giant Scorpions. One of those scorpions is larger and redder than the rest, and is a miniboss. Little Ozur's Camp is south of the fort.
The gate leading to Cyrodiil lies at the eastern end of the road south of Fort Sphinxmoth's wayshrine. Many Dominion Soldiers and a single merchant reside there. A chest can spawn by the cliff off the side of the road north of the merchant's cart, near two senche-tigers. An entrance to Northern Elsweyr lies down the road south of the merchant's cart. NPCs associated with the Lightbringer, Give to the Poor and Crime Pays achievements can spawn at the base of the hill between the path leading east to the Dominion camp and south to Little Ozur's Camp.
Related QuestsEdit
- Fort Sphinxmoth Objective: Help the priestess of Mara recover her lost relics. / You helped the priestess of Mara recover her relics.
- An Affront to Mara: Retrieve relics stolen from a Temple of Mara.
- Prisoners of the Sphinx: Free the Imperial prisoners.
PeopleEdit
|
LayoutEdit
Initial Fort RuinsEdit

An armed bear trap is located at the eastern end of the first hallway. Another bear trap is located at the entrance to the next room. Two bandits linger in front of the bridge that crosses overhead. One bandit is hammering away at the bridge's supports. If you travel to the northwestern corner of the room, you'll find a camp with three bandits at it. If you head west from here, you'll enter a hallway with spike traps in it.
.jpg)
Pressure plates around each row of spikes give the appearance of being able to disarm the spike traps (the plates even glow when you sneak), but this is a trick; a chained prisoner, however, will deactivate them with a hidden switch on the wall during the events of her quest.
Two bandits are digging in the northeastern corner of the first room. Talania Priscus lies wounded on the stairs, south of these bandits. Fire traps are on the ground all over the second floor. You can head north, south, or west from here. Two bandits can be found by a campfire in front of the landing. A bear trap is on the ground on the other side of the northern bridge. Darius is on the western end of this platform. A note addressed to him is sitting on the ground in front of the nearby keg. The Phylactery of Mara is nearby. A collapsed portion of the ceiling can be found on the western platform. The southern platform is where you'll find a tunnel leading through the rest of the fort. When you cross the southern bridge, you'll find a camp with a fire, which two bandits are standing around. Several tables are set up for dining, and there are two more bandits by the door to the southeast.
If you make a right turn immediately upon entering the tunnel, you'll come upon a side room full of bear traps, as well as burning crates and barrels. Veranus Macatus is being held captive here. A bandit can be found patrolling the eastern end of this hallway. Two more bandits are clearing away rubble from a collapsed portion of the tunnel.
Ruined BarbicanEdit
The next area is overgrown. There's a broken staircase to the right as you enter. You can jump across the gaps to make it up to the second floor. There's not much up here, but a Note to Cardia is sitting atop a crate at the top of the stairs. There are pressure plates on the floor in this room. When you step on them, you'll take poison damage over time from the noxious green poison gas that fills the air. The pressure plates glow when you sneak, allowing you to disarm them. The Storage Vaults lie beyond a door on the east side of this room.
Storage VaultsEdit
Entering the Storage Vaults brings you to the southern half of the fort. The hallway leads south. The floor is partially destroyed in this hall; repairs have been made by way of wooden planks, but there's a spot you can fall through the floor to reach the Croc Pit, which is on the ground floor. There's a backpack at the end of this hall, near the stairs leading west. There are more storage areas in the hall beyond the stairs.
Old ChapelEdit

Pressure plates in this hallway will unleash poison gas if you step on them. If you make a right turn at the bottom of the stairs, you'll enter a cell with a stack of crates in it. There's a note on top of the crates. If you instead turn left, you can pull a lever to enter a cistern with three crocodiles in it. There's a door at the eastern end of the room. Pulling the lever by this door leads you to the fort's Croc Pit. There are three bandits at the western end of the prison hallway, in the old chapel that has since been converted to a storage vault, standing around a non-functional cooking fire. The Outer Court lies behind the door beyond this group of bandits.
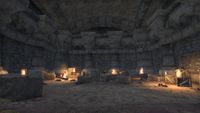
The Croc PitEdit
The Croc Pit is a square chamber which four crocodiles call home. Decanus Vulso is trapped in here. The corridor by the Croc Pit's only exit has constellation panels lining the walls. A skeletal corpse lies beneath the Steed, next to a lantern and An Unexpected Defense. There are panels representing the Lady, the Tower, the Lord, the Mage, the Thief and the Steed. Solving this puzzle allows you to exit the Croc Pit during Prisoners of the Sphinx.
Outer CourtEdit

The subterranean tunnel that makes up this area's entrance leads into a stone tower. A single bandit guards the way into said tower. There's a Note from Captain Accalia on the ground floor of this tower, sitting atop a cot south of the tower's front doorway. A cage is set up beneath the stairs, behind a few bedrolls. You must climb the stairs to enter the courtyard proper. A river runs through here, starting at a waterfall to the north and running across the yard to the north. There are a few crocodiles wallowing by the water in the north side of the courtyard. Engannas is located in front of a ruined tower in the southwestern corner of the courtyard with a generic bandit, channeling shock magic.
You can progress by entering the tunnel to the north, which the river is running through. There's a door at the end of the tunnel leading into the Inner Court. There are three spike traps saddled between gargoyles on either side in the middle of the hall, right in front of the door. There are fire traps behind each gargoyle, and there's a single poison pressure plate beyond the spike traps, on the right-hand side. There are a few containers and provisioning ingredients to loot in the tunnel.
Inner CourtEdit
Captain Accalia is in this large chamber. A single bandit sleeps in the tent in the southeast corner of the room. Three bandits are standing in front of a large tent in the northwestern corner of the room, eating and drinking. One bandit is looking through the group's loot in the northeastern corner of the room. Two bandits guard a gate in the southwestern corner which can only be passed by pulling a lever. The gate is draped in Khajiit-style curtains.
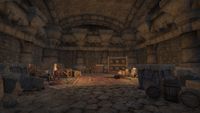
Behind this gate is a room containing urns, crates, kegs and many other containers. There's a bearskin rug in front of the urns. South of this rug lies a table and a chair. There is a pile of coins and a book containing the Sphinxmoth Bandit Leader's Notes on the table. There's a lever next to the gate that allows you to reenter the Inner Court. A lever next to the gate at the northern end of the room leads you back into the fort's entrance. This is a one-way trip; if you pull this lever, you can only reach the Inner Court again by traversing the entirety of Fort Sphinxmoth all over again.
 WayshrineEdit

Fort Sphinxmoth Wayshrine is located to the southwest of the fort, on the other side of a large rock formation.
MapsEdit

GalleryEdit
-
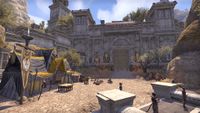
The Dominion camp by the gate to Cyrodiil
-
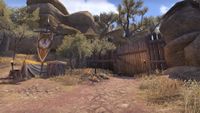
Gate to Northern Elsweyr
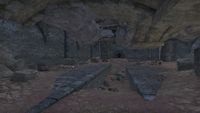
-
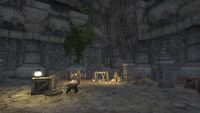
Northwestern prisoner room
-
The burning prison
-
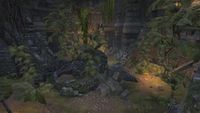
The Ruined Barbican's "garden"
-
The Croc Pit
-
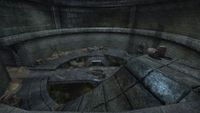
The Croc Pit
-
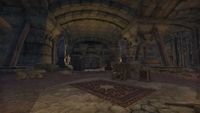
Inner Court
-
Accalia's treasure room

.jpg)


