| This page is currently being rewritten as part of the Online Quest Project. The page is being both written and checked. All users are welcome to make changes to the page. If you make a change that is relevant to the project, please update this template accordingly, and make sure you have observed the project guidelines. Detail
Quick Summary: not written
Quest Stages: written by Rhynchelma, not checked |
|

Quick WalkthroughEdit
- Talk to Zaeri.
- Talk to Commander Karinith.
- Get the survivors to safety.
- Talk to Sergeant Firion and choose who to take along into Cat's Eye Quay.
- Search the tavern, the warehouse and the mines to find Ealcil's research notes.
- Find Ealcil.
- Drain the Storm Totems while traveling through the Wind Tunnels.
- Disrupt the ritual, then make your escape!
Detailed WalkthroughEdit
After you've returned to Harrani following Ulondil's justice, Zaeri runs up to you and tells you that Sea Vipers have attacked Cat's Eye Quay. The defensive forces are thin, so they need all the help they can get, otherwise Mistral will fall.
Head into the entrance to the quay and meet Commander Karinith, who will direct you to urge civilians away from the fighting. Berantin and Calpion are a little further towards the quay, so try to persuade them to leave. Calpion will return to Mistral, but Berantin will insist that he must stay and fight. Talk to Sergeant Firion, who will tell you they only have a very small counterattack. Either a marine or a wizard will stay to guard the area, while the other—whom you pick—will follow you into the quay. Sergeant Firion is the marine, and the wizard is a generic Dominion Wizard, Rurelion, or Gathwen, depending on your progress in Tears of the Two Moons.
Continue on with your new companion and fight Sea Viper forces. While you examine the area, you'll find Ealcil's research notes in the hands of Edhelas and Nistel's corpse in the tavern and the warehouse respectively, with the final page being held by Mazar, a survivor of a massacre inside the mines and the collapse of the mine entrance. Mazar will direct you towards another entrance to the mine, and mention that a wizard gave him a piece of paper.

Enter the Wind Tunnels and find Ealcil. He talks about the Sea Vipers' "Storm Totems", which harness energy from people marked with runes. Such a tactic would indicate the need to collect energy and release it very quickly for explosive power. He excitedly informs you, however, that he has a lodestone which can be used to collect the energy from the totems and interrupt them. He also informs you that this tactic is completely safe, since "It's not as though the Storm Totem's energies will cascade throughout your body until you're nothing but a lifeless, smoking husk. But do avoid standing in puddles, would you?"
Walk through the mines and interrupt each of the totems, killing Sea Vipers along the way. At the end of the tunnels, Ealcil's psijic projection will speak with you, telling you that he's discovered what's going on. The Sea Vipers have captured a storm atronach—the Tempest spoken of before—and plan to use it to destroy Khenarthi's Roost, completely annihilating Mistral. To stop the process completely, you must deactivate the three horns surrounding the atronach outside. Ealcil reassures you that everything will turn out alright, and he'll even be watching—from a league away, of course. "Merely a precaution. I have every confidence!"
Deactivate the three horns, while watching out for the giant snakes and their powerful Sea Viper masters. Once the horns are down, run away from the now-free atronach.
You will run into Razum-dar again, who leads you safely back into Cat's Eye Quay and directs you towards Captain Jimila, who can take you to Auridon. Raz will give you something from the Mistral armory, a two-handed sword called the Storm-Slave's Razor.
NotesEdit
- The quay's market will be empty of NPCs before starting the quest or reaching the related objective.
- The Broadhead Marines and Mazar won't exist at the quay before starting the quest or reaching the related objective.
- While the objective description mentions Ealcil was previously met at the Temple of the Mourning Springs, he isn't actually found there at all during the quest, and is found with the Mourning Stone at Eagle's Strand instead.
- Passing through active Storm Totems doesn't inflict damage or any negative effects on you.
- Despite what Ealcil warns, using the lodestone while standing in water doesn't cause any problems.
- It is not required to perform the full animation to turn off the totem. Cancelling right after initiating the animation will still count the totem as completed for the objective.
- Despite's Ealcil's and Razum-dar's warnings, it's not necessary to run away after disabling the horns. Storm-Slave's energy release causes no harm when standing nearby.
GalleryEdit
-
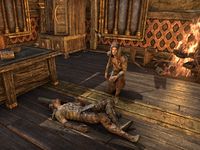
Edhelas helps a hurt Onglorn
-
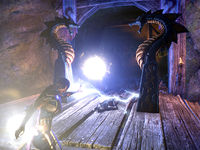
Interrupt the Storm Totems inside the Wind Tunnels
-
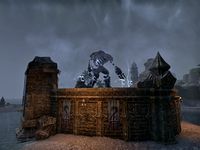
The captured Storm Atronach


Quest StagesEdit
| The Tempest Unleashed | |
|---|---|
| Finishes Quest | Journal Entry |
| Dominion Commander Karinith needs help holding the line against a Maormer invasion. I should speak with her at the docks.
Objective: Talk to Commander Karinith
|
|
| Commander Karinith asked me to direct survivors from the attack on Cat's Eye Quay to safety.
Objective: Direct Survivors to Safety
|
|
| I need to reach the defenders at the gate to Cat's Eye Quay.
Objective: Find the Dominion Marine
|
|
| I need to reach the defenders at the gate to Cat's Eye Quay.
Objective: Talk to Sergeant Firion
|
|
| Sergeant Firion believes the Maormer attack on Cat's Eye Quay is more than it seems and asked for my aid in stopping their plans. I should decide whether the marine or the wizard should come with to aid me.
Complete one: The Wizard or The Marine
Objective Hint: Choose the Marine or the Wizard as an escort
|
|
| I should enter Cat's Eye Quay and look for signs of what the Maormer plan.
Objective: Enter Cat's Eye Quay
|
|
| The Maormer attack ravaged Cat's Eye Quay. I should explore and see if I can find any indication of what they're doing, and why.
Objective: Find Signs of the Maormer Plan
Objective Hint: Search Tavern
Objective Hint: Search Warehouse
Objective Hint: Search Mine
|
|
| The clues I've found lead me to an old smuggler's den in some caves on the northern edge of Cat's Eye Quay. The entrance to the Wind Tunnels is blocked, but there is a secret entrance somewhere near the cliffs. I should find this secret way in.
Objective: Enter the Wind Tunnels
|
|
| I discovered the author of the notes in the Wind Tunnels. I previously met Ealcil at the temple of the mourning springs. I should find out what he's doing in Cat's Eye Quay.
Objective: Talk to Ealcil
|
|
| Ealcil says he's adapted a Maormer waterstone to drain the energy being collected by their Storm Totems. He hasn't been able to make it work but seems to believe I can. I need to try it on the totems in his cave.
Objective: Use Ealcil's Lodestone
|
|
| I was able to use the lodestone to drain a Storm Totem. I should speak with Ealcil to see if it worked as expected.
Objective: Talk to Ealcil
|
|
| In order to stop the Maormer ritual, I must drain the Storm Totems within the Wind Tunnels.
Objective: Use Lodestone to Drain Storm Totems: x/5
|
|
| I drained the Storm Totem. I should talk to Ealcil and find out what he's learned of the Maormer ritual.
Objective: Talk to Ealcil's Psijic Projection
|
|
| I need to bring the charged lodestone to the Maormer ritual site. I can use it to disrupt the horns used to bind "storm-slave," which Ealcil says will foil the Maormer plans.
Objective: Disrupt So'Wester Horn
Objective: Disrupt Centralia Horn
Objective: Disrupt Nor'Easter Horn
|
|
| I released Storm-Slave and stopped the Maormer plan. Razum-dar showed up and urged me away from the ritual site. I should follow him back to Cat's Eye Quay.
Objective: Escape the Ritual Site
|
|
| It seems the Maormer attack has been thwarted. I should speak with Razum-dar and see how he knew to find me.
Objective: Talk to Razum-dar
|
|
<Alias=LocationHold>) is dynamically set by the game and will be filled in with the appropriate word(s) when seen in game.
- Not all Journal Entries may appear in your journal; which entries appear and which entries do not depends on the manner in which the quest is done.
- Stages are not always in order of progress. This is usually the case with quests that have multiple possible outcomes or quests where certain tasks may be done in any order. Some stages may therefore repeat objectives seen in other stages.