
This level is a continuation of Administration, Labs and Library, Part 1, so you don't get to level up or heal before entry. Additionally, there is no way to return to the previous section of the level, unless you have set a recall anchor somewhere there.
You can learn a number of things here through conversation and scrolls, in particular about a mace named Scourge. You must find this mace, four voidguide pieces, and a Web Sigil of Entry to continue on to Level 3.
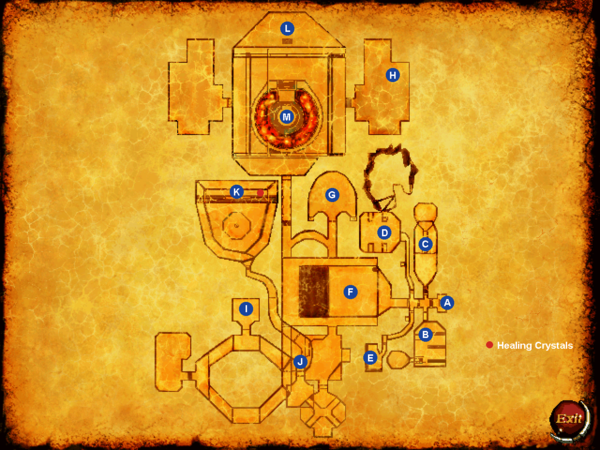
Quick WalkthroughEdit
- You teleport in from Level 2a at Point A.
- Enter the first door to the south and click on the mace above the entranceway (Point B). Go into the secret room at the south and get the Scourge mace. Step back on the lift platform to activate it.
- Go into the library at Point E, find and take the scroll about the Scourge mace.
- Kill the Spider Daedra at Point J to get the Web entry sigil.
- Talk to Spider Daedra Chief Wonshala at Point K to learn more about the Scourge mace. If you give her the mace, she will give you a piece of the voidguide in return. In this way, you can skip searching for one of the other four pieces that are located on this level.
- Grab four voidguide pieces found at Points C, D, I, and H. Talk to the Daedra Lord Sumeer Jabran at point L and put the voidguide pieces into the device in front of him. This activates the teleportal at Point M, which brings you to Level 3.
Detailed WalkthroughEdit
Point AEdit

The teleporter from Level 2a, Point K drops you off here, where you are immediately confronted by a host of Daedra. These halls are teeming with Dremora,Spider Daedra, Vermai, and Scamps, and it's a long way to the next healing crystals, so be cautious.
Point B - ArmoryEdit


There is little of interest in this armory, save for a mace curiously stuck above the door. Attempting to remove it triggers a secret mechanism, which raises one of the tables to reveal an elevator. Step on the platform to go down, and discover a secret room containing a wonderful lion statue (which also activates the elevator if you get stuck) and a powerful magical mace named Scourge.
Point C - North BarracksEdit


The northeast passage leads to a College barracks, now overrun by a pack of Scamps. Fight them in the hallway to avoid being swarmed. There isn't much to find in the room, but a careful search reveals a lift concealed beneath the intricately designed rug. This leads to a hidden chamber which contains a piece of the voidguide.
Point D - InfirmaryEdit


This appears to be some sort of training or study room. A Spider Daedra stands guard, but the tight quarters may make it difficult to maneuver. Once you've destroyed the Daedra, take a look around. Given the number of secret chambers you have discovered nearby, it makes sense that there may be more than meets the eye here as well. Search carefully, and you will find that the bench to the northwest rises up to reveal yet another hidden room. The coffins within indicate this is some sort of crypt. Another piece of the voidguide can be found at the back of the chamber, but you will need to fight through a pack of Scamps to get there. In multiplayer mode, there is a teleporter that teleports you back to the previous zone.[verification needed — is it only there in multiplayer?]
Point E - LibraryEdit


The door here opens into a winding hall occupied by a single Dremora. Follow it to the end, and you will find yourself in one of the College's libraries.
This small library is occupied by a Dremora named Tanchelm, who wishes to speak. After a brief conversation, you can acquire a scroll from him before he teleports away. This scroll outlines some of the motivations and forces behind the various Daedra clans and is rather useful. A number of other scrolls are also found here; of particular note is one which describes the Scourge mace you found near Point B. Looking over the scroll reveals some important details; it seems like the mace is capable of banishing a Daedra with a single blow (this doesn't actually happen, however, the Scourge only functions as any other mace).
Point F - Great HallEdit


The doorway at the end of the hallway opposite Point A opens into what appears to be a large dining hall. Scamps and Vermai will immediately descend upon you, so be prepared for quite a fight. The western end of the hall becomes a wide staircase, and stationed at the top are a pair of Dremora. More Vermai and Dremora from the adjoining rooms may join the fight as well, so watch your back. There is a chest on the upper level, in the northeast corner.
Four hallways connect to the upper level. The southeastern hallway opens into some sort of potion-making facility. A firepit burns brightly in the center and numerous potions of healing and restoration adorn the shelves. Unfortunately, you will have to fight your way through several Daedra to get to these items. A Coffer of Restoration sits against the west wall.
The room beyond is some sort of storage room, but contains nothing apart from a few Scamps. The remaining hallways ultimately lead to Points G (northeast), K (southwest), and L (northwest)
Point G - Large Bedroom (Sirran Angada)Edit

The northeastern hallway leads to a large bedroom, far more opulent than the barracks from earlier. Atop a dresser is a curious letter, addressed by the Imperial Battlemage, Jagar Tharn. It appears that Lomegan Mariel (who surrendered the Portal Keys to the Daedra) is actually a shapeshifted Sirran Angada, and some sort of agent in Tharn's service. The clothing item of Transmorph found on the floor next to the bed would seem to confirm the letter's veracity. Another Coffer of Restoration can be found in the southwest alcove.
Point H - East ArchiveEdit

This large chamber is filled with tables and chairs, and dominated by a cozy fireplace. A voidguide piece sits atop a table, but you must fight or evade the Vermai here to get it.
There is a similar room on the opposite side of Point M, which contains more Vermai as well as some loot, and a copy of the Codex Arcana, Volume IV.
Point IEdit

The Scamps have hidden another piece of the voidguide in this room. There isn't much here; a table sits to one side and a bed occupies the other. The box at the foot of the bed doesn't contain any loot, but when moved aside reveals the hidden voidguide piece.
Point JEdit

A Web Sigil of Warding bars the way here. Fortunately, a Spider Daedra (whose name is Perthan Serni)[nb 1] is stationed nearby and has the Sigil of Entry needed to pass through. Kill him and take it.
Point K - ConvocatoryEdit


This is the chamber of Wonshala Keriayn, Chief of the Spider Daedra forces. She is interested in acquiring the Mace called Scourge, which you found at Point B, as well as the keyword which unlocks its powers. If you give her the mace, she will give you a piece of the voidguide in return, then attempt to test the Scourge—on you. However, since no Daedra may wield the Scourge, the weapon will send her directly to Oblivion instead (along with the mace).
Note: to learn the keyword, you must read the scroll titled "Legendary Scourge" at Point E. Wonshala will not give you the voidguide piece without this information.
The only healing crystal in this half of the level is found here, in the northeast corner of the room, and restores your health.
Point LEdit


Here you find the Daedra Lord Sumeer Jabran, who seems to be the one in charge around here. After a brief talk, you can agree to reassemble the voidguide in exchange for safe passage through Battlespire. The five pieces of the voidguide are found at Points C, D, H, I and K (however, you only need four of these five pieces to open the portal). Put them into the glowing blue device in front of Sumeer.
Point M - VoidgateEdit


Some sort of large teleportation device sits here, idle. To activate it and move on, you must return the pieces of the voidguide to Point L. Once the device is operational, step into the center to be teleported to The Soul Cairn.
EnemiesEdit
Total number found in level 2a and level 2b:
- 18x Dremora
- 30x Scamp
- 22x Spider Daedra
- 30x Vermai
NotesEdit
-
- Pg. 102 makes mention of Perthan Serni, but it is vague on which Spider Daedra he is. Given Perthan Vorn's role in guarding the Meht Sigil of Entry in Level 2a, Serni is likely the Perthan at Point J guarding the Web Sigil of Entry.
BugsEdit
- A magical cape found on this level may be worn as pants.
- Scamps on this level may disappear into the terrain.
- Attempting to move the voidguide piece found at Point I to your inventory may cause the game to crash ?
.png)