|

Quick WalkthroughEdit
- Receive yet another vision from Ria Silmane in your dreams.
- Travel to the Mages Guild in Winterhold, Skyrim.
- Infiltrate the Fortress of Ice to recover a magical tablet.
- Return the tablet to the Mages Guild and learn of the location of the Labyrinthian.
- Go to the Labyrinthian and retrieve the second piece of the Staff of Chaos.
- Survive yet another attempt made on your life by your enemy.
Detailed WalkthroughEdit
Yet Again, in a DreamEdit
After you retrieve the first piece of the Staff of Chaos, Ria Silmane will appear to you in your dreams yet again, the next time you sleep. This time, she will say:
"It seems that you were well chosen. I see that you have won the first piece of the Staff. That in and of itself is not a simple task. Tharn, it seems, is not as concerned with you as I had thought he would be. Perhaps he thinks you dead or lost in the sewers from which you escaped. That is well, for I have discovered the second piece's location. There was once a great maze, built by the Archmagus Shalidor to guard what he called Glamorill, the elven term for 'The Secret of Life'. I know not the location of the great maze, which was called the Labyrinthian, but somewhere in its twisted corridors lies the second piece of the Staff of Chaos. Shalidor, according to the old texts, made his home in the Fortress of Ice. He would not have built the Labyrinthian far from his home. I would search to the north for such a place. I wish you well on your journey..."
Winterhold, Part 1Edit
Asking around about the Labyrinthian leads you eventually to the Winterhold Mages Guild. The leader of the Guild, Thelen Kaarn, tells you that while they'd like to help you, some rogue knights made off with a stone tablet that would complete a map to the Labyrinthian. Also, because you're the only one who cares, you're the only one who's going to get it back. When you agree to go, you are provided with the location of the Fortress of Ice. It's just a bit southwest of Winterhold.
Fortress of IceEdit
This is a two-level dungeon teeming with cold monsters and humans in what must be rather cold suits of armor. The way down to the second level is actually quite close to the entrance to the fortress itself, but unless you have Passwall, you'll have to go through a maze-like set of rooms and corridors to get to it. A word of caution to melee classes: you will need at least an Elvish weapon to be able to defeat any Ice Golems you meet, so make sure you pick something tasty up before heading off on this quest. Even with a proper weapon, Ice Golems can take and deal significant damage before falling, making Invisibility a useful tool for evading most of them. The constant Snow Wolves will likely be the first spellcasters you face in quantity. While their ice spells can quickly destroy unprepared characters, they can be made trivial with the application of Spell Absorption. Light is another helpful spell for the Fortress of Ice, as without it the ranged enemies will often exploit your limited view distance to attack you from the shadows.
When you enter, if you immediately hug the west wall, by the time you turn the corner you'll see the blue square that signifies the way down. This is a huge help if you have Passwall, and a big help even if you don't: it saves a lot of searching for the way down. Make your way to it, doing your best not to be frozen by snow wolves or swatted down by ice golems and humans.
The second level of the fortress is also a maze-like set of corridors and rooms. You start in the east central part of the level, and the tablet is in the northwest part of the dungeon. Again, Passwall is a big help if you have it; otherwise, be prepared for a long crawl and lots of monsters. If you don't have Passwall, you'll initially have to go south and traverse some tunnels before you can make your way to the section of the dungeon in which the tablet resides. Once you get there, you will be presented with a riddle:
- I touch your face,
- I'm in your words,
- I'm lack of space,
- And beloved of birds...
- What am I?
The riddle has some possible correct answers: "air", "the air", "wind" or "the wind".
Once you get in, grab the tablet (43,3). It's lying on the floor. Bring it back to Winterhold. Upon grabbing the tablet, you should receive this message:
- You have found the Tablet that Thelen Kaarn spoke of. Once he has hold of it, he can use it to decipher the location of the Labyrinthian...
Winterhold, Part 2Edit
Back in the Mages' Guild, present the tablet to Thelen Kaarn. He then marks the location of the Labyrinthian on your map, in the north central part of Skyrim. Before heading to Labyrinthian however, you may want to stock up on potions and prepare yourself mentally for a long and excruciating dungeon.
LabyrinthianEdit
"Stubborn grass and roots stand in the stiff arctic clime, refusing to yield. Ahead of you stands the entrance to the Labyrinthian, testing ground of the Archmagus Shalidor. Within its twisted paths lies the second piece of the Staff of Chaos..."
Labyrinthian is a very large and tortuous dungeon. It is chock-full of raised walkways, trenches, and tunnels. On your dungeon map, the raised areas and the tunnels are the same color, so it can be difficult to tell which way to go even when you look at the map. You may think the path you're taking is good, but then you'll be dead-ended because where a walkway ends, a tunnel below you keeps going, and there will be no easy way to get to the tunnel from where you are. In short, it's a frustrating dungeon to navigate.
The first thing you see on the first level is a series of three cage-like doors along with the message:
- Proceed along the center path first, for the clues to solving the secrets of the Labyrinthian await there...
If you go through the middle door, you'll get a dungeon back story and an idea of your first task: to obtain the key to a magically locked door. You are told that to get that key, go down into the lower level via the first door. The back story reads as follows:
- This is the tale of two brothers,
- who sought the secret of life.
- They ventured into this Labyrinthian,
- weary from war and strife...
- The first was Kanen the Elder,
- a strong and cunning man.
- He quested for riches and jewels,
- yet found Fate had other plans...
- The second was Mogrus the Dim,
- and few knew what he was worth.
- They saw only the lumbering giant,
- not the child who was blessed at birth...
- The few they told of their plans,
- begged them to desist at their feet.
- But the brothers would test this puzzle to the North,
- for till then they had known no defeat...
- This is the tale of two brothers,
- who failed the secret of life.
- Forever held by two riddles which lead to the prize,
- and a wit as cunning, and sharp as a knife...
The first locked door door you find denying you access to the Staff Piece will display a message:
- Mogrus the Dim, though he's a bore,
- Holds the only key that unlocks this door.
- To find the riddle, you must first find the son,
- Start your fateful search behind door number one...
So, the first objective is getting a key from Mogrus's wraith in the second level. It's not particularly easy to get to the lower level. The Labyrinthian lives up to its name. However, if you go through the first door and go northeast, you will quickly see on your dungeon map the blue dot that signifies the way down. Make your way to it and go down to the second level of the dungeon into the Domain of Mogrus as indicated my a message right before the entry.
You can find Mogrus's key in the northeast corner of the dungeon. The best method to get there is to find the raised walkway running north-south on the eastern side and stick to it going north, jumping over trenches and tunnels if need be. When you get to his room, there are two cages: one holds the key, the other holds Mogrus (or at least what's left of him after all these years). You'd like to just grab the key and not have to deal with Mogrus, but of course there's a riddle first:
- I am brother Mogrus, the shade of this hall,
- Cursed to its lengths, from beginning to end.
- Find me the answer, and a door will I call
- Fail me but once, and your heart will I rend...
- -
- More beautiful than the face of your God,
- Yet more wicked than a Daemon's forked tongue?
- Dead men eat it all the time,
- Live men who eat it die slow...
- -
- What is the answer, mortal?
The correct answer is "nothing". Mogrus responds friendly but cryptically to a correct answer before vanishing:
- I have been a fool,
- Perhaps a mad wizard's tool.
- Yet after untold ages,
- I am at last free.
- In the cell next to this
- lies your reward, the Diamond Key...
A wrong answer results in Mogrus' Wraith form turning hostile along with the words:
- Curse you for a fool,
- And now taste my wrath...
The two cages are magically locked. Answering the riddle correctly will unlock the cage door behind which lies the key. Answering incorrectly will unlock the door to the cage where Mogrus resides; and he's a tough fight. Even if you manage to defeat him, you still have to eventually get the riddle right or the other door will not unlock for you. Once you get the door unlocked, grab the diamond key (10,12) and make your way back up to the first level. Go back through the middle door (50,45) and use the key to unlock the first magically locked door (50,16).
Once you do that, make your way around to the next door. You are then told of a new objective:
- Kanen the wise, holds more to be seen,
- a key and a riddle, and a test in between.
- To get past this portal, a feat done by few,
- search for the brother behind door number two...
To get by this magically locked door, you'll have to go through door 2 on the current level and make your way down yet again to the second level.
The way down to the Domain of Kanen is the same distance and angle from the entrance as Mogrus's, except it is southwest and not northeast (it's mirrored, if the mirror is on a y-axis in the center). It's a little harder to find than Mogrus's, but it's not far and is similarly indicated as Kanen's right before entering. Make your way to it and re-enter the second level, but this time down to the Domain of Kanen.
(By this time you may notice that Mogrus's domain takes up the east half of the dungeon and Kanen's takes up the west half. Never the twain shall meet, not even with Passwall.)
Kanen and his key are in the southwest corner of the dungeon. You can reach it by raised walkway or by tunnel. Your best bet is to take raised walkways south and west as much as possible. The shortest path will take you a short way through a trench. His setup is exactly like his brother's: he's in a cell, the key is in a cell next to him, and you have to solve a riddle to open it:
- I am the brother Kanen, who holds the secret of life.
- Not a more cunning riddler, 'twixt ocean and fief.
- Answer me this question, o' foolish mortal from above,
- or join my eternal task, borne of duty and love...
- -
- Two bodies have I,
- Though both joined in one.
- The more still I stand,
- The quicker I run...
- -
- What is thy answer?
The correct answer is "hourglass" or "an hourglass". Get the sapphire key (84,92) and use it to open the corresponding door on the first level (50,6). A correct answer is accompanied by the message:
- I am free to fly the wind,
- after an eternity of sickness and sin!
- As a reward for setting me free,
- The cell next to this holds your Sapphire Key...
A wrong answer instead causes the same results as with Mogrus along with a different message:
- Thou are wrong mortal, now
- your soul will I take for eternity...
Again, make your way around the wall to the other side where there sits the door between you and the Staff piece. As is Jagar Tharn's tendency, there is a riddle for you to answer first:
- Here lies the final portal, the doorway to life...
- -
- What force and strength
- cannot get through,
- I, with a gentle touch, can do;
- And many in these twisted halls would stand,
- Were I not, as a friend, at hand...
- -
- Answer?
The correct answer is "key" or "a key" and upon answering with either you receive this message:
- Thou art truly worthy of Shalidor's
- prize, the second piece of the Staff
- of Chaos awaits...
A wrong answer, this time without major consequences, instead reads:
- Thou hast answered in haste,
- and truly erred...
Answer the riddle and collect your prize (50,9). Upon taking the staff piece, a message pops up:
- The second piece of the Staff of Chaos burns brightly with cold fire as it touches the first piece. They meld together perfectly...
AmbushEdit
Your next random monster encounter will bring you your second ambush and vision from Tharn:
"You have survived the tests most dire. Continue along this path however and you will face such things as to make your very heart freeze. I will save you the ordeal for my servants approach you even now. From your managled corpse I will take what is mine..."
NotesEdit
BugsEdit
- In the second level of Labyrinthian, using door number two (Domain of Kanen), there is a chest that cannot be opened in the southeast corner (54,95). It makes no sound if you try to break in with a weapon and if you pick the lock, it will make the open sound and the floor tile will change, but the chest remains and allows you to pick it over and over.
MapsEdit
-
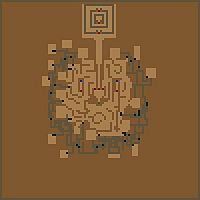
First Level
-
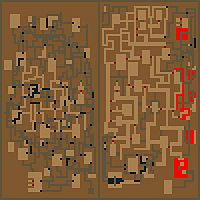
Second Level


Quest LogEdit
| Labyrinthian () | ||
|---|---|---|
| Stage/ Index |
Finishes Quest | Journal Entry |
| 0 | (Date): The Mages Guild of Winterhold has marked the Fortress of Ice on your map of Skyrim... | |
| 1 | (Date): The Mages Guild of Winterhold has inscribed your map with the location of the twisted corridors of the Labyrinthian in the province of Skyrim... | |
| Prev: Fang Lair | Up: Main Quest | Next: Elden Grove |