
.png)


The Observatory is an ancient Dwarven structure containing an orrery and a telescope, located off the southern cliffs of Hunding Bay on Stros M'Kai. The entrance is connected to the road to Saintsport by a short bridge.
Richton ordered an old Wood Elf named Erasmo to fix the mechanisms inside. Erasmo was able to repair the orrery, but he injured himself while trying to fix the telescope. You must bring a gear back from the Dwarven Ruins to make the Observatory fully functioning again, so that you can determine the Serpent's path and save Hayle's soul.
The orrery is the primary feature on the main floor, surrounded on the walls by images of the twelve constellations (minus the Serpent). From left to right, they are the Thief, Ritual, Lover, Lord, Mage, Shadow, Steed, Apprentice, Warrior, Lady, Tower, and Atronach. There are rune buttons at the base of each panel, which cause the telescope to move in a circular path over to that area. The upper platform where the actual telescope is located can only be reached initially using the two steps near the entrance. Stepping on the top step will cause the bottom one to move up and become the next step. If you fall, they eventually come back down. There is no need to go to the upper platform until you fix the telescope, though. The Telescope section explains how the telescope works.
At the back of the orrery room, there is a rectangular section of the floor that opens if you step on the button nearby. An elevator goes up and down here to the gear room. Erasmo's room is on the north side of the elevator, down some stairs and through a hexagonal doorway. The wheel on the left turns off the steam in the gear room, or back on if it's off, which is helpful to avoid losing health. The lever on the right turns on a ceiling fan for a short while. His bed is in the northeast corner and a table with some notes is in the northwest corner, next to a potted plant.
The gear room south of the elevator is quite complex, but the only important part is the path leading directly forward from the elevator. There is a moving platform you must watch out for. If you did not turn off the steam, there is some coming out of the engine and blocking your path. While possible to cross, you will take 15 damage per second. Climb up and move around the central pillar that forms the base of the orrery, then jump down to the platform that the red pipe connects to. These pipes damage your health by 10 points per second. Below this platform is the slot where you insert the Dwarven gear. If you don't have the gear as your current item, Cyrus says, "Looks like a gear is missing from this slot." A door opens to a narrow walkway on the south end of this small room. On the opposite side is an elevator that takes you back to the orrery.
Related QuestsEdit
- Save Hayle's Soul: Help Saban guide her son's soul through the necromancer's snare.
ResidentsEdit
|
TelescopeEdit

As explained above, the telescope moves to a constellation when you step on the corresponding rune button. It starts out at the Atronach. Once the Dwarven gear is in place, you can get up to the telescope by climbing on the circular "hand", which rises to the top. To get back down without dying, you must hang from the "head" of the mechanism, with the red band across it.
At the top, a wheel can be turned to change the pitch of the telescope. There are three settings and by default it is set to the lowest. From the top, you can look through the telescope and observe the sky. Each constellation only shows at a certain pitch, while the other pitches show empty space. These are shown in the table below.
| Thief | Ritual* | Lover | Lord | Mage/Mechanist | Shadow | |
|---|---|---|---|---|---|---|
| High |  |
 |
|
 |
|
|
| Medium |  |
 |
|
 |
 |
 |
| Low |  |
|
 |
|
|
 |
| Panel |  |
 |
 |
 |
 |
 |
| Rune |  |
 |
 |
 |
 |
 |
| Steed | Apprentice* | Warrior | Lady | Tower | Atronach* | |
|---|---|---|---|---|---|---|
| High |  |
|
 |
 |
|
|
| Medium | |
 |
|
|
|
 |
| Low | |
|
|
|
 |
|
| Panel |  |
 |
 |
 |
 |
 |
| Rune |  |
 |
 |
 |
 |
 |
* The Redguard Companion refers to the Atronach as the Golem and gives Dwarven variants of the Mechanist's charges: the Automaton (Apprentice), the Warmachine (Atronach/Golem), and the Laboratory (Ritual).
NotesEdit
- The constellations are in order of their corresponding month from left to right, starting with the Thief (Evening Star/December) and ending with the Atronach (Sun's Dusk/November).
- Runes are also in order from left to right, starting at A for the Thief and ending with R for the Atronach. Blue runes are used for guardians and yellow runes for charges.
- On the telescope interface, the presence of the Serpent is indicated by a red rune in the bottom left. Additionally, the Warrior has a copy of its rune with an extra mark in the top right, indicating that it is the current season.
- The telescope's pitch corresponds to a guardian and its charges. High is the Warrior, Medium is the Mage/Mechanist, and Low is the Thief. These are also represented on the ceiling star chart by the distance a rune is from the center of the galaxy, with low being closest. The runes are also in order on the star chart, clockwise starting from the top.
- If you manage to fall to the bottom of the gear room without dying (most likely when trying to reach the gear slot), it is actually possible to get back by maneuvering through an obstacle course. To start, get over to the north side and climb on the walkway surrounding the circular abyss. From here you can jump onto one of the rotors. If you get on top of it in time, you will automatically be put on the next rotor. Now run toward the center of the rotor and time your jump back to the gear slot room.
- The Observatory appears in ESO's version of Stros M'kai, but more closely resembles a generic ruined Dwarven tower. The interior is inaccessible.
GalleryEdit
-
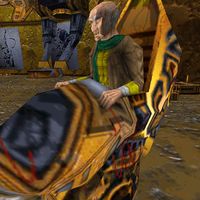
Erasmo, the Observatory's Wood Elf attendant
-
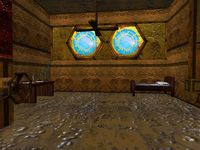
Erasmo's room
-
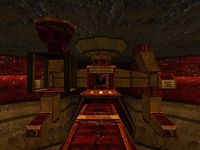
The gear room
-
Loading screen
-
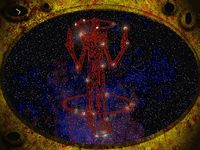
The Lord without the Serpent's Head
-
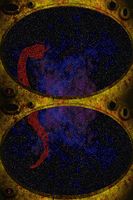
The Serpent on its own


