Open main menu

UESPWiki β

Redguard:Places

< Redguard(Redirected from Redguard:Alchemist's Shack)

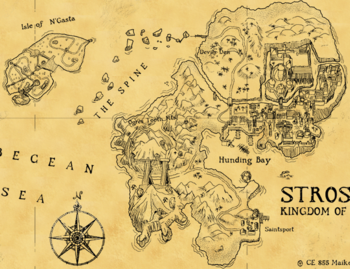
There are many places to find and explore in Redguard. The majority of your adventure takes place on the island of Stros M'Kai, with the exception of the Isle of N'Gasta to the west and the League hideout, in an unknown location probably to the south. The main town on Stros M'Kai bears the island's name, which can cause some confusion. However, it is usually referred to as the "town" or "city".

The maps below are marked with all interesting places in the game. Certain places, such as dungeons and buildings, have more details on their respective pages. For information on the shrines of Kynareth (or "teleporters" as they are labeled on the maps below) that provide fast transportation around the island, see this page.

Island Map of Stros M'KaiEdit

N'Gasta's TowerIsle of N'GastaThe Spine BridgesYokudan CampTreasure Vaults ExitDevil's DenCavern SinkholeStatue of ThassadAlchemist's ShackImperial CampDwarven Steam PipesDwarven RuinsArkay Fertility StatueObservatorySaintsport LighthouseSaintsportSerpent SkeletonBoat WreckageTown Map of Stros M'Kai 
 
Devil's Den
 
Statue of Thassad
 
Alchemist's shack
 
Imperial camp
 
Arkay fertility statue

Points of InterestEdit

Point A — N'Gasta's Tower
This old wizard's tower is where N'Gasta lives and practices necromancy. Two vermai attack you immediately upon entering. One of the rooms has a glass vial and a cauldron with elixir to put in the vial. Pouring the elixir into the central pit triggers an explosion, which can propel you to the spiral staircase above. The necromancer stores a variety of potions and alchemical ingredients on the top floor.
Point B — Isle of N'Gasta
The Isle of N'Gasta is an island west of Stros M'Kai, and home to the Sload necromancer N'Gasta. For three gold, a mysterious boatman will transport you there across the treacherous waters. Numerous skeletons and zombies inhabit the isle and defend against intruders. At the southwestern end is N'Gasta's Tower, separated from the rest of the island by a dangerous gap.
Point C — The Spine Bridges
A series of old wooden bridges lead to the boat which takes you to the Isle of N'Gasta. They are in a severe state of disrepair; some planks break off when you first try to cross.
Point D — Yokudan Camp
The camp of the only Yokudans on Stros M'Kai, Saban and Coyle, is found here.
Point E — Treasure Vaults Exit
The dragon Nafaalilargus uses this large door to move in and out of the treasure vaults deep within the Catacombs. You leave the vaults through this door when recovering the soul gem because the way back is shut. The door cannot be used to enter at any time.
Point F — Devil's Den
There is a small cave at this location, with a loony island thug waiting inside. He is protecting a stash of gold, a health potion, and a strength potion.
Point G — Cavern Sinkhole
A large sinkhole in the ground is found here, revealing a boat in the caverns. With some luck, you can hang from the edge, but falling is certain death.
Point H — Statue of Thassad
The headless statue of Thassad is just northwest of town. As the parrot in Gerrick's Goods rhymes, "twenty-one paces, as the head faces, buried there the gold still gleams!" Walk 21 paces in the direction the fallen head faces, and dig with a shovel to discover 300 gold.
Point I — Alchemist's Shack
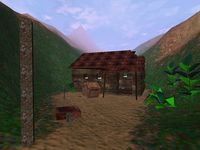
This is the abandoned shop of the town's late alchemist, Vromish, who died seven years ago. Based on its appearance, the building was likely damaged in a fire. You can find ectoplasm, Hist sap, Orc's blood, spider's milk, and a glass bottle inside. A gold pouch lies on the ground near the two crates out in front.
Point J — Imperial Camp
A campsite or archaeological dig of some sort is found here in the Ogres Tooth Mountains. As you approach you will notice a large airship which flies away toward the town. Four guards patrol this area and will attack you on sight. There are seven pouches of gold scattered around the camp among the piles of Dwarven artifacts (which are simply decoration).
Point K — Dwarven Steam Pipes
This area is across the two bridges from the Dwarven Ruins, and can only be reached from there. It contains lots of machinery that uses lava to boil water, producing steam, which then powers everything in the ruins.
Point L — Dwarven Ruins
The entrance to the Dwarven Ruins. There are three guards patrolling outside and two sacks of gold in the vicinity.
Point M — Arkay Fertility Statue
In this secluded area stands a large statue, which despite the name depicts Morwha, a Yokudan fertility goddess. If you stand in front of it, you can offer one gold to be healed 10 points. A nearby guard will attack regardless of whether you're wanted by the Imperials.
Point N — Observatory
The island's observatory can be found south of town, and contains an orrery and telescope. An old Wood Elf named Erasmo lives here and was ordered to fix the broken machinery. His quarters and the gear room are located on the lower level, accessed via the lift.
Point O — Saintsport Lighthouse
Saintsport's lighthouse is in the northwest corner, and stays locked until you use the rusty key given to you by the Restless League prisoner. The League flashes the light as a signal for their ships to arrive at the docks. Erasmo believes ghosts are responsible for the flashing.
Point P — Saintsport
This small town was probably abandoned, but three of the houses still have locks. A fourth house with no door contains a health potion, strength potion, and three bags of gold inside. The central gazebo has a painting of Leki on its ceiling. The open house may be the residence of the hostile thug you encounter here, who claims Cyrus is a thief trying to steal his treasure.
Point Q — Serpent Skeleton
The skeleton of a large creature, presumably a sea serpent, lies here. The only items of interest are two pouches of gold and a third that can be dug up nearby.
Point R — Boat Wreckage
At this location are the remains of an old boat, along with a crazy island thug who will attack you on sight. One gold pouch can be found in the boat and another can be dug up nearby.

Geographical FeaturesEdit

Abecean Sea
The sea surrounding Stros M'Kai.
Hunding Bay
A bay separating the town of Stros M'Kai in the north from the Observatory and Saintsport in the south.
Ogres Tooth Mountains
Mountains on the west side of the island, featuring the Dwarven Ruins and Imperial camp.
The Spine
Shoals along the west coast of Stros M'Kai which nearly reach the Isle of N'Gasta.
Hallin Falls
The waterfall under the bridge on the northwest side of town.

Town Map of Stros M'KaiEdit

Statue of HundingBrennan's ShipHarbor TowerGoblin CavernsParkGerrick's GoodsSilversmith'sKrisandra's HouseBell TowerCatacombs EntranceBurning PyreTemple of ArkayMage's GuildCartographer'sJ'ffer's BooksRollo's HouseWellDraggin TalePalaceJailOld Quarter 
 
Burning pyre

HarborEdit

The harbor consists of the docks, warehouses, and the large Statue of Hunding that extends out into Hunding Bay.

Point A — Statue of Hunding
The statue of the legendary Frandar Hunding who drove the goblins into the earth. His talisman sits in a small room reached from the connecting wall. See the side quest Find the Talisman of Hunding for a walkthrough of how to get it.
Point B — Brennan's Ship
This is the dock area of Stros M'Kai, where you first arrive on Brennan's ship to begin your adventure.
Point C — Harbor Tower
The bottom door of this building is locked; climb the stairs to find the actual door. Inside, you can go down to the lower level and find a chest of gold, or up and across the bridge to talk to Prnell. He sits atop a tall chair and looks out over Hunding Bay with his telescope. The old man will request your help finding his eyepiece.
Point D — Catacombs Entrance
This is where you exit the Catacombs for the first time and later come back to find the treasure vaults. Iszara gives you a gold key to open this door after you rescue her from N'Gasta.
Point E — Burning Pyre
A burning firepit, most likely a guide for ships entering the harbor at night or under heavy fog.
 
Park

MarketEdit

The market is on the raised land north of the harbor and has several shops and the town's park.

Point F — Goblin Caverns
Hidden behind the magnificent waterfall is the entrance to the Goblin Caverns. According to The Redguard Companion, the waterfall is called Hallin Falls, named after the Redguard hero Derik Hallin.
Point G — Park
The town's park, where Brother Kithral was last seen before he disappeared some time ago.
Point H — Gerrick's Goods
Gerrick owns and runs the only general store on Stros M'Kai. He has a number of useful items for sale, but only the shovel is explicitly required. His rhyming parrot may be annoying, but can guide you to buried treasure.
Point I — Silversmith's
The store of the silversmith, Krisandra. She has nothing for sale, but lets you take her silver boat after you kill two soldiers searching her house.
Point J — Krisandra's House
Initially this is just a locked house, but it is opened when you begin seeking the Flask of Lillandril. On the opposite side of the building is Krisandra's locked storeroom, containing a silver boat. She will give you a key should you help her as described above.
Point K — Bell Tower
The Bell Tower is operated by Favis, who works together with Prnell to alert the town of approaching ships. Because of his poor hearing, Favis thinks the bell is broken. You can climb the rope and check to discover it's in fine condition. Cyrus also spots Prnell's eyepiece on a ledge next to the bell.
 
Town square
 
The town well

Town SquareEdit

This is the main section of town, east of the market and slightly higher in elevation. It is also called the Plaza of the Three Princes according to The Redguard Companion. The central landmark is the Monument of the Three Princes, standing above the Regent's Pool. You can find the tavern, temple, Mage's Guild, and more shops here.

Point L — Temple of Arkay
This temple, dedicated to Arkay, is where you find Brother Nidal. He can fully heal you and has a wealth of information and advice. Kithral was another member, but he went missing three months ago. If you bring Kithral's journal to Nidal, he will heal you free of charge. It's later revealed that the body of Prince A'tor is hidden in the Temple's center. Once you have saved Hayle's soul and obtained Voa's ring and the soul gem, Saban will attempt to resurrect the Prince.
Point M — Mage's Guild
Falicia sells potions of all kinds in the guildhall. She also provides a great deal of information about Iszara and Joto if you've been to the League hideout. Archmage Jaganvir becomes enraged when he discovers her talking about the Crowns, and turns Cyrus into a gremlin. The Mage's Guild has a basic set of alchemical ingredients, useful for mixing Orc's blood with pig's sac. Upstairs, there is a basin filled with water in which you see A'tor lying in stasis at the Temple.
Point N — Cartographer's
The map maker Maiko K'Elmar owns this cartography shop, but refuses to make you an island map. He is more helpful later on, when you need to decipher notations from the book Elven Artifacts vIII. On the walls and desks, there are maps of distant lands such as the Summerset Isles. The well-known Smuggler's Den is downstairs, but the entrance is behind the building. You must learn the password to get in.
Point N — Smuggler's Den
Located under the Cartographer's, the Smuggler's Den is locked and you need a password to get in. Urik is in charge of the Den, smuggling various items including Valenwood wine.
Point O — J'ffer's Books
The only bookstore on the island, run by a knowledgeable Khajiit named J'ffer. Several books are on display and can be purchased, two of which are required for quests.
Point P — Rollo's House
This is the home of Rollo, an irritable dock worker. He won a silver locket while playing cards with Lakene, and keeps it safe inside the chest he usually sits on.
Point Q — Well
The town well, a good source of fresh water to fill a glass bottle. You can also mix aloe into the water before you fill the bottle to increase the healing effect.
Point R — Draggin Tale
The island's only tavern, run by a resourceful Argonian named Dreekius. The tavern is a good place to practice your sword fighting skills with the local Forebears, as well as catch up on all the latest news and gossip. You can also find your friend Tobias here at the beginning of the game.

OtherEdit

These places are north of the town square, on land even higher up.

Point S — Palace
Prince A'tor lived in the Palace before the Imperials defeated the Crowns at the Battle of Stros M'Kai. Now the Provisional Governor, Lord Richton, rules from here and grants few audiences. You briefly visit the entry chamber when you deliver N'Gasta's amulet, and explore the rest of it during the final quest Raze the Palace.
Point T — Jail
The island jail, where Richton locks up anyone conspiring against him. The door is locked, so the only way in is through the right-hand window. You must be in gremlin form to fit. Joto, a Khajiit and friend of Iszara, is imprisoned here and will reverse the gremlin spell. The exit you must take leads to the Old Quarter.
Point U — Old Quarter
Nafaalilargus destroyed the Old Quarter before your arrival, and the Imperials have it locked down. It's normally accessed through the Jail, but you can also perform a careful jump on the south side of the quarter to get through the gate. A lot of gold and items are lying around, but there are plenty of guards.

Other PlacesEdit

League Hideout
You travel to this hideout via a ship that docks in Saintsport. It's in a sea cave somewhere near Stros M'Kai, and consists of a dock and several buildings. Basil, the leader of the Restless League, and Vander are found here. After you talk to them, Basil allows you to enter Iszara's lodge to open her journal.
Realm of Clavicus Vile
Clavicus Vile and his dog reside in this plane of Oblivion. Near Vile is a locked house with a tall roof. You first appear on the other side of a bridge crossing a stream, and the Daedric prince teleports you out of the realm if you successfully win back Iszara's soul.

NotesEdit

GalleryEdit