| This article is being developed as part of the Skyrim Houses Redesign Project. If you see this tag it means the article can still be improved. Please see the project page for guidelines. |
|
|||
|---|---|---|---|
| # of Zones | 5 | ||
| Respawn Time | See notes | ||
| Important Treasure | |||
| Daughter of the Niben Dwemer Puzzle Cube The Warrior's Charge Twin Secrets Unusual Gem Spider Control Rod |
|||
| Console Location Code(s) | |||
| MarkarthUnderStoneKeep, MarkarthWizardsQuarters01, MarkarthWizardsQuarters02, MarkarthWizardsQuarters03 | |||
| Region | |||
| The Reach | |||
| Location | |||
| Second tier, western side of Markarth | |||
| Special Features | |||
| # of Alchemy Labs | 2 | ||
| # of Arcane Enchanters | 3 | ||
| # of Tanning Racks | 1 | ||
| # of Forges/Anvils | 1 | ||
| # of Grindstones | 1 | ||
| # of Workbenches | 1 | ||
| # of Cooking Pots/Spits | 5 | ||
| Shadowmark | |||
| Ore Veins | |||
| # of Corundum | 1 | ||
| # of Iron | 4 | ||
| # of Moonstone | 1 | ||

Understone Keep is an ancient Dwarven keep built into the mountainside, used as a palace by the Jarl of Markarth.
Upon entry it looks as if it is only a cave, but it soon opens up into the Jarl's palace. It is a very large area containing the Jarl of Markarth's seat of power (known as The Mournful Throne), the Jarl's living quarters, the Jarl's personal blacksmith, the palace's kitchen, general living quarters, the war room, and the excavation base. There are four places that can be accessed only through the Keep: Nchuand-Zel, the Dwemer Museum, Calcelmo's Laboratory, and Calcelmo's Tower. A part of the Markarth city map called Markarth Wizards' Balcony is only accessible through the Keep. The Hall of the Dead also has a door to the Keep, though it has its own separate entrance as well.
From the Keep entrance, the palace is straight ahead, the museum is to the right, and the lab and doors to the Hall of the Dead and Nchuand-Zel are located to the left. It is possible to get to the ledge on top of the entrance to the palace, but there is nothing there. There are two guards at the entrance to the palace, and another at the top of the stairs to the right who will tell you that the museum if off-limits unless Calcelmo grants you access. To the west of the stairs is a Juniper tree, and there is a stone bench around the small Dwemer structure to the east. Light comes from four braziers—two by the palace gate and two by the museum entrance—and from the tunnel leading to the excavation base.
The current Jarl is Igmund, and he is attended by his Steward Raerek and his Housecarl Faleen. Igmund has aligned himself with the Imperial Legion. If the rival Stormcloaks take control of the city, Thongvor Silver-Blood will be installed as Jarl, and he will employ Reburrus Quintilius as his Steward and Yngvar the Singer as his Housecarl.
ResidentsEdit
| Imperial Court | Position | Stormcloak Court |
|---|---|---|
| Igmund | Jarl | Thongvor Silver-Blood |
| Raerek | Steward | Reburrus Quintilius |
| Calcelmo | Court Wizard | Calcelmo |
| Faleen | Housecarl | Yngvar the Singer |
| Legate Emmanuel Admand | Military Advisor | Kottir Red-Shoal |
|
|
||||||||||||||||||||||||||||||
Related QuestsEdit
Primary Quests—quests that largely take place in the keep
- The Book of Love: Help the Temple of Mara spread the cause of love throughout Skyrim.
- Bothela's Discreet Delivery: Deliver the Stallion's Potion to Raerek or Reburrus.
- Buy Dwarven artifact: Bring your newly-obtained Dwarven artifact to Calcelmo in Markarth. (radiant)
- Coated in Blood: Bring a Daedra heart to Moth gro-Bagol.
- Compelling Tribute: Blackmail a Talos worshipper into helping the Stormcloaks. (radiant)
- Deliver Spiced Beef to Voada: Deliver an item to an associate. (radiant)
- Delivery to Calcelmo: Deliver a ring to Calcelmo.
- Dungeon Delving: Do a favor for Igmund, the Jarl of Markarth, by retrieving a shield. (radiant)
- Hard Answers: Help translate Gallus's journal.
- If I had a HammerCC: Steal a legendary hammer of the gods.
- Kill the Forsworn Leader: Do a favor for Jarl Igmund by killing a Forsworn leader. (radiant)
- My Pet MudcrabCC: Buy a Dwarven Mudcrab.
- Nimhe, the Poisoned One: Kill the giant frostbite spider blocking access to Nchuand-Zel.
- Search and Seizure: Find evidence of a Talos worshipper for the Thalmor.
Secondary Quests—quests where only a portion takes place in the keep
- The Bonds of Matrimony: Find someone in Skyrim to marry.
- The Litany of Larceny: Find items for Delvin Mallory throughout the questline.
- The Lost Expedition: Recover the journals from the expedition in Nchuand-Zel.
- No Stone Unturned: Find the 24 gems to restore the Crown of Barenziah.
- Recipe for Disaster: Assume the identity of the famous Gourmet in an effort to assassinate the Emperor.
- The Taste of Death: Prepare a feast for the Lady of Decay.
- Thane of the Reach: Gain the title of Thane of the Reach. (radiant)
- This location is one of many potential targets for one or more of the Radiant quests.
Understone KeepEdit
Jarl's PalaceEdit

The palace entrance is a set of dwemer gates leading to five sets of side-by-side stairs. This is where Thongvor Silver-Blood goes, and stays, after harassing Brother Verulus about the closure of the Hall of the Dead when you first enter. The middle set of stairs leads directly to the entrance of the Jarl's throne room, while the other four—two on each side—ascend to the side of the throne room. Two inactive dwarven centurions stand in alcoves on either side of the entrance, and two inactive dwarven spheres flank the stairs. The Mournful Throne is the throne on which the Jarl of Markarth sits. Just below the throne is a stone chair for the Steward, while the housecarl stands on the other side of the room. There are two additional alcoves here, each containing a Dwemer chest.
From the throne room, the blacksmith's workshop is north, the general quarters and war room are northwest, the kitchen is south, and the Jarl's quarters are southwest. The layout of the area outside the throne room is symmetrical. First, there is a stone bench followed by a table with a single seat by the western wall; opposite the table is another table with two seats, and behind the pillar by the two-seat table is a Juniper tree. On the single-seat table between the throne room and the blacksmith's workshop, there is a copy of the Alteration skill book Daughter of the Niben. Between the throne room and the kitchen are the Jarl's two pet dogs.
Ondolemar paces along the top of the stairs with two Thalmor Soldiers during the day, in an attempt to influence proceedings when the Jarl holds court. He disappears if the Stormcloaks gain the city.
Jarl's QuartersEdit
The Jarl's Quarters are quite large and opulent, and the doors are secured with an adept lock. The first cupboard on the right holds a random potion and the book Lost Legends. There is a cooking pot by the fire, and a leveled potion on the shelf next to the fire. There is an assortment of food items on the table, and some gold and a leveled necklace can be found on top of the dresser on the other side of the table.
Up the steps by the dresser is the Jarl's bed and a table. There is an end table at the foot of the bed, on top of which is a copy of the Conjuration skill book The Warrior's Charge, and underneath is a copy of the Key to Markarth Keep. The table holds a leveled dagger, some gold, and a gem in a wooden bowl. An alcove between the bed and the table contains a shield, which will be replaced by Hrolfdir's Shield if you have retrieved it for the Jarl.
On the other side of the dresser is an opening to part of the river running through the keep. If you edge around the pillar you will find a hidden stash of items: a chest, three coin purses, and a display case holding one gold ingot and two dwarven ingots.
KitchenEdit

The kitchen is where the master chef Anton Virane prepares meals for the residents of the Keep, with help from his two assistants, Rondach and Voada. They also sleep in this area, though thankfully not where the food is prepared. An assortment of food items can be found on the corners of the corridor to the kitchen.
The western side of the first room is the food preparation area. Just to the right of the door is the staff dining table with three chairs. Strangely, one of the three chairs faces away from the table. By the fire is a cooking pot and a copy of Uncommon Taste. There are some shelves by the north wall, opposite which is a small larder. Throughout the area is a very large amount of food, particularly concentrated on the shelves and in the larder.
The eastern part of the room is Anton's. There is a small table with a single chair, and the raised section holds a dresser and Anton's bed. Opposite the entrance is a second room which functions as both a storeroom and a bedroom, containing more food as well as two bed rolls for Rondach and Voada.
Blacksmith's WorkshopEdit
The workshop is maintained by Moth gro-Bagol, who serves as the Jarl's personal smith, and despite serving in the Legion will retain his position even if the Stormcloaks gain control. The two beds are used by Moth's sister Ghorza gra-Bagol, who runs the public smithy for Markarth, and her assistant Tacitus Sallustius. This leaves Moth with nowhere to sleep, so he works through the night, which means you can trade with him twenty-four hours a day.
The workshop is dominated by the forge, which is situated in the middle of the room. There is also, clockwise from the door, a workbench, a tanning rack, a training dummy, a grindstone, an armory table, a display rack, Ghorza and Tacitus's beds, and a cupboard. There is an iron ingot on the workbench, a woodcutter's axe to the left of the tanning rack, and a war axe embedded in the training dummy's head. The armory table and display rack hold an assortment of iron and steel weapons and armor.
Living QuartersEdit
The general living quarters are in the northwestern corner and are off-limits to outsiders. The rooms are through the first doorway in the corner and to the right. Both doors have an adept lock, and a guard patrols from here to the war room.
The northern room belongs to the current Jarl's Housecarl. Just to the right of the door is a cooking pot, while on the other side is a stone shelf with some armor. There is a long table with a single chair, a wardrobe, an end table, and a bed. On top of the end table is a copy of the Key to Markarth Keep. The western room is the Steward's, and contains a bed, a dresser, a small table with two chairs, a cooking pot, and an end table. On the dresser is another Key to Markarth Keep and a copy of The Legend of Red Eagle.
War RoomEdit
Straight ahead of the same entrance to the living quarters is a set of stairs; there is a potion on a shelf to the right, and the entrance to the war room on the left. There is a large stone table with a civil war map surrounded by four stone chairs. On each side of the main table is another small table with a chair and an end table, as well as a single bed in the middle. There is a bow on the table with a keg, and the other table holds a helmet, a shield, and a Key to Markarth Keep. There is a novice-locked display case on the right-hand end table with two leveled ingots, one of a light armor material and the other of a heavy armor material. The bed belongs to Legate Emmanuel Admand. Ondolemar spends the night here with his bodyguards, eating and sitting at the tables.
Excavation BaseEdit

The Excavation Base sits at the entrance to an excavation site aimed at unearthing the history and any secrets of Nchuand-Zel, a cavernous Dwemer castle carved deep into the mountain. The excavation is headed by Markarth's Court Wizard, Calcelmo, who is an expert on everything Dwemer, and who has also been placed in charge of curating all artifacts extracted from the ruin.
The base is in a huge hollowed-out part of the mountain, and contains the entire front entrance to Nchuand-Zel. Just to the right is Calcelmo's workstation, where he is aided by Aicantar. There is an Arcane Enchanter, an Alchemy Lab, and a stone bench. The small area is flanked by two stone pillars containing some Dwemer items and Dwemer-related books. The pillar to the right also has a Dwemer Museum Key on it.
To the extreme left, past a Dwemer construction, is Markarth's Hall of the Dead. The entrance to Nchuand-Zel is across a bridge just south of Calcelmo's workstation. There are no items to be found anywhere else in this area. The entrance to Nchuand-Zel is an example of the intricacies found in dwemer buildings and ruins, and can be used to see how each path seems to loop around on itself. The river flowing through the middle of the area is the one from the Jarl's quarters, and is the same river that flows through the center of Markarth.
Dwemer MuseumEdit

The locked door to the Dwemer Museum is located up the stairs just north of the main entrance to the Keep. There is a guard at the top of the stairs who will warn you that the museum is off-limits. You will need Calcelmo's permission and a key to enter legally. There are a number of keys to be found; two notable keys are the one the museum guard has, and the one near Calcelmo.
There are three guards patrolling the museum. Two are around and near the central display, and the other is to the south of the central display. To the left of the pillar in front of the entrance is a shelf with some Dwemer dishes (bowls, cups, pans, etc.), while a shelf on the right contains some Dwemer construction items (levers, plate metal, scrap metal, etc.). There are four novice-locked display cases ahead, all containing Dwemer household items. Moving around the room to the right, there is an inactive dwarven spider on display, with nine dwemer cogs around the base. There is a shelf and a novice-locked display case to the right with construction items, and some construction items and an expert-locked display case containing a dwarven dagger can be found by the inner pillar; these items include eleven more cogs. The outer wall displays a working example of a dwemer mechanism. With the Stendarr's Hammer Creation installed, this is the room where you will find Stendarr's Hammer, lying on a stone display pedestal in the corner.
The next section is a display area for items found on the current inhabitants of Dwemer ruins, the Falmer. There are three display cases—one apprentice-locked and two adept-locked—containing a sword, a war axe, a bow, arrows, a shield, and a club, all of which are of Falmer make. On the shelf is an empty Falmer chest, two glowing mushrooms, and a Falmer club. Outside this section is an adept-locked display case containing three Falmer-related books. Next, there are some Dwemer shelves and a Dwemer dresser, all containing household items. There is a corridor in the wall opposite leading to a storage area with an adept-locked gate. There is a Dwemer pressure plate straight ahead, which activates some spinning blades. The room contains a random assortment of Dwemer items, food, and other miscellaneous items; there is also an apprentice-locked Dwemer chest on the second floor.
Back in the main room and around the corner is an expert-locked display case with mixed Dwemer items and a gold and silver ingot and necklace. Across the opening is an apprentice-locked display case with mixed Dwemer items. The opening aligns with the corridor asending to the west to Calcelmo's Laboratory, which is adept-locked. By the next pillar is a loaded but inactive Dwemer ballista, and by the wall a broken spinning blade trap is on display. Down the steps there is a stone shelf with an assortment of Dwemer-related books, including the three books Calcelmo wrote. Past the shelf is an adept-locked display case with two dwarven ingots. There is an inactive dwarven sphere on display, along with an assortment of construction items and an expert-locked display case containing an enchanted dwarven sword. In the corner is a working example of dwemer central heating.
There is a room to the south with an expert-locked gate. Inside is a Dwemer dresser, an expert-locked chest, a stone table, and an Unusual Gem on the table. Back by the entrance to the museum are two adept-locked display cases and three unlocked display cases on the shelves. The two locked cases contain some rare books, including the Chronicles of Nchuleft, the ordinary version of Chimarvamidium, Nerevar Moon and Star, and War of the First Council.
The museum is centered around an inactive dwarven centurion. Around the pedestal are twelve expert-locked display cases containing one of each type of Dwarven weapon, including an extra sword, some arrows, the dwarven sphere centurion arrow, and also some pieces of Dwarven armor, including a set of boots, a pair of gauntlets, two helmets, and two shields.
Clearing out the museum before starting the Hard Answers quest has no effect, since the guards respawn. During the quest the only difference is that two guards will have a conversation by the first pillar about the extra guards drafted in by Calcelmo before moving to their patrol routes.
Calcelmo's LaboratoryEdit
There is a stone shelf straight ahead that holds a few Dwemer scrap items. Once you enter the main room, there is a room to the left which contains two random soul gems. There is an oil slick on the ground running from this room around the rubble in the main room to a locked gate. The large room is a mess, with mixed Dwemer items lying on the floor all around the room. Through the unlocked door to the west is a pillar with a stone table by each side. The four tables each have two stone chairs, and hold an assortment of Dwemer items. Past the pillar to the west is a room with four stone benches facing a broken pulpit. There is a guard that patrols around the benches, sometimes sitting at the table to the left. Behind the pulpit is another locked door. There is a room to the north that is ostensibly Calcelmo's, which implies the bedroom to the south belongs to Aicantar. Aicantar's room contains a single bed, an end table, a cupboard, and a fair amount of food.
Calcelmo's room is actually two rooms, with a short L-shaped corridor leading to it from the pulpit area. The first room has a Dwemer dresser and a cooking pot by the fireplace to the left, and a small round table with a single chair and a wardrobe to the right; there is a fair amount of food in this room. A short set of stairs opposite the wardrobe leads to the bedroom. The bedroom contains a double bed, an end table, two dressers, and two chairs. On the left-hand dresser are three scrolls (a scroll of Firebolt, a scroll of Courage, and a scroll of Candlelight) and a leveled potion or poison. On the right-hand dresser is a small coin purse and an apprentice-locked display case containing the three books written by Calcelmo.
This is as far as you can go without doing the quest Hard Answers. Everything that follows is described as when the quest is active, as this is the first time you will be able to access the below areas. All of the living guards from this point are wizard's guards who wear a full set of steel or steel plate armor, making them tough to handle as a group.
During the QuestEdit
The Spider Control Rod can be found on the table in the first room to the left of the entrance. It controls Aicantar's Spider, which is present at all times in the lower Dwemer hatch to the right, though it will not emerge until the rod is lifted. Aicantar's lab journal is also on the table, and provides some insight into the research and making of the rod and spider.

The traps do reset, and can be used on the wizards' guard that comes through the first locked gate. The gate can only be unlocked by the guard, which will always happen as a scripted event. The second door just past the gate is barred from the other side, so the guard phases through it rather than opening it, meaning you must take the long way around. The Markarth City Guard (who is replaced by a Stormcloak if Markarth changes hands in the Civil War, or as a result of Season Unending) does not respawn if killed beforehand, though a wizards' guard appears either alongside the city guard or on their own. The lock on the door behind the pulpit is changed to a master lock. Both wizards' guards carry a copy of Calcelmo's Laboratory Key, while another copy of the key appears on the table beside Calcelmo's bed.
Through the Locked DoorEdit
The door behind the pulpit opens to a short zigzag corridor that ends with a set of ascending stairs. To the left at the top of the stairs is a corridor guarded by two wizards' guards, who are discussing previous malfunctions of the mechanisms in the corridor. The corridor is fairly long, with two sets of alcoves, and in between each section there is a static spinning blade trap (a total of three). The two guards patrol along the sides of the corridor, while a third may be present on the other side, but does not venture into the corridor. The first alcove to the left contains a table with two pieces of leveled heavy armor, while the second alcove to the right has a master-locked Dwemer chest behind the Dwemer construction.
To avoid the guards, you must travel underneath them. Follow the path past the corridor to the west from the entrance and descend the ramps, turning right three times until you come to a corridor filled with a green mist. There is a potion hidden in the rubble at the bottom of the ramps. The poisonous gas is quite deadly, though luckily not flammable. Trying to cross in a single movement usually results in death, but there is a trick to crossing. To the north, before entering the mist-filled corridor, is a pressure plate which activates the vents which drain the gas. There are a further five plates strategically placed along the corridor to aid passage, with the additional bonus of being unaffected by the Light Foot perk. You may want to pause at each plate to recover your health, and consider saving along the way. Characters with strong poison resistance will have little trouble crossing here, but will still slowly take damage, even at 100% resistance.
There is a city guard lying dead by the entrance to the gas-filled corridor, as well as a lootable skeleton straight ahead and a plate immediately to the right, and another guard between the skeleton and the plate. Dragging a guard's body onto a plate is an easy way to turn off the gas. Just before the next dead guard and skeleton there is a plate on either side. Through the arch and immediately to the left is another plate, then a third skeleton by the final plate to the right.
There is a ramp at the other end of the corridor, and at the top of the next ramp to the right is a valve that activates the nearby spinning blades. The patrolling guards will be oblivious to the activated blades, and will walk right into them. Past the pillar with the blades is a door to the east which, through a few short linear corridors, leads to the wizards' guards rooms.
The first room is centered around a large square table with two chairs on a raised section of the floor. There is a guard patrolling from the door on the other side of the room to the room on the left, past another guard who is eating a meal. The table holds some food, and there are two inactive Dwemer spheres opposite the entrance. The dining room to the left has four tables, each with two seats, placed by the faces of a square pillar. There is another room on the other side, with a random weapon in the rubble to the left, and a lootable skeleton with a potion and a large coin purse nearby just around the corner to the right.
Through the double doors to the east is the section blocked by the barred door. Aicantar and up to three guards can be found in this room. At the far end of the caged section overlooking the room is a valve that activates a Dwemer ballista, which is aimed directly in front of the valve. The valve also activates a spinning blade and several flame spouts in the room, with the latter aimed both across the room and in a V across the viewpoint from the caged section. Strangely, the flame spouts are situated above head height, meaning you can walk under them. If you wish to keep Aicantar alive, he will panic and run from the room when the valve is activated, opening the barred door. Otherwise, choose your moment to activate the valve to decimate the guards, then move quickly to prevent Aicantar from leaving.
By the Dwemer light source is the gate and the steps down into the room. Straight ahead is a stone table with two chairs. On the table are two soul gems and a copy of Lost Legends. To the right is the table where Aicantar was sitting. On this table is a copy of the ordinary version of Chimarvamidium, the Enchanting skill book Twin Secrets, and a Dwemer chest. There is an arcane enchanter under the valve. Farther along are two tables shoved together into one L-shaped table, and to the south is the Dwemer Puzzle Cube. To the north of the L-shaped table is the barred door, while the door to the east leads to Markarth Wizards' Balcony.
Markarth Wizards' BalconyEdit
The Markarth Wizards' Balcony is a very small outdoor area which connects the laboratory and the tower. It is actually part of the Markarth city map space, and can be accessed via persistent rock climbing. To the left is a dead-end next to a waterfall. To the right, there are two flights of stairs. After the first flight, the one in front leads directly to the door to the tower, while another flight to the northeast leads to a barred window with a view of the center crag of Markarth featuring the Temple of Dibella and the Guard Tower.
There is a path between the rocks, just to the left of the first flight of stairs, that leads to the main waterfall in Markarth. It is possible to "ride" the waterfall down to ground level, or with a bit of luck, drop down to the deep section of the water below. You will find two skeletons of unsuccessful jumpers in the water at the base of the waterfall, near one of which are two loose gold coins.
Calcelmo's TowerEdit

The door opens to a short corridor, with four tattered flags hanging from the walls. At the end of the corridor is a room with a raised platform. To the right is a set of stairs leading up to an overhang at the same level as the platform. There is another overhang on the opposite side, and a narrow catwalk on either side of the corridor to the entrance. To reach these additional areas, you may stand on the empty Dwemer brazier on the left at the end of the first overhang, and jump. The second overhang has only a smattering of Dwemer items. It is possible to jump up to the platform from both the stairs to the right and the second overhang.
To the east of this area is the normal path, which leads up a set of stairs and through a door to Calcelmo's research area. The room contains many items that hint at how Hard Answers should be continued. To the right of the door is a small table, behind which is an inactive Dwemer centurion. Straight ahead from the door is a T-shaped table with ten rubbings of various Dwemer items, while there are two leveled potions on the other side of the table in the taller of the two shelves.
To the left is a compact area containing, in order from the left, a set of shelves, a dresser, an arcane enchanter, an alchemy lab, and two more shelves, all around a medium-sized stone table. On the table is a copy of the Heavy Armor skill book Chimarvamidium, and between the enchanter and the lab are two petty soul gems. There is a hefty number of Dwemer items, charcoal, and rolls of paper lying on and around everything else in the room.
Just to the left of the door to the north is an expert-locked Dwemer chest. Through the door is the raised platform with the tablet inscribed in Falmer and Dwemer. When the guards appear, they will talk for a moment, then split up to look for you. To give them the slip, drop down to the stairs, now on the left, continue up the overhang, jump onto one of the catwalks, and finally drop down to the exit door.
NotesEdit
- Most of Understone Keep will respawn after 10 days. However, the Dwemer Museum and Calcelmo's Laboratory never respawn.
- The content from chests close to jarl's throne is labeled as owned, so taking it means stealing it, until completion of The Book of Love: Help the Temple of Mara spread the cause of love throughout Skyrim. Then content of chests becomes freely available.
- There is a "Danger" shadowmark to the bottom right of the door leading to the Dwemer Museum. This is due to the high number of aggressive guards inside.
- Although it appears to be in the same zone as the city of Markarth, you cannot fast-travel from the Wizard's Balcony. You can, however, jump down from the narrow waterfall path below Calcelmo's Tower to the city proper and fast-travel from there.
- With 33 locks (gates, chests, and display cases), the Dwemer Museum is probably the best training place in Skyrim for practicing your Lockpicking skill.
BugsEdit
- Even though you should be able to enter the museum freely after you have been given the key, you might in fact still be considered trespassing.
- It is possible that a follower may refuse to talk to you while in Calcelmo's Laboratory, since they believe you are trespassing. This is problematic, as they will not follow you out of the room, and will remain "stuck" there. ?
- To fix this bug, draw a weapon and damage your follower until they leave your service. They will then leave the Laboratory on their own volition. Once they're outside, you can ask them to follow you once again.
 An alternate fix is to bring up the console while in the museum and click on your follower. Leave the museum, then reopen the console, type
 moveto player, and press enter.
- Ondolemar may become hostile to you on sight, which will also cause his two attendant Thalmor soldiers to attack, and may also cause the jarl and his court to turn hostile to you, even if you have no bounty in the Reach.
- This may be caused by you attacking a random Thalmor party encountered in the wilderness (even if you kill all witnesses).
- To fix this, reload a previous save and commit a minor crime, such as punching a Markarth guard, then clear the bounty using the usual methods.
GalleryEdit
-
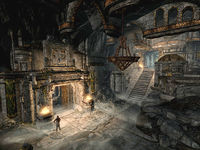
Entrance hall of Understone Keep
-
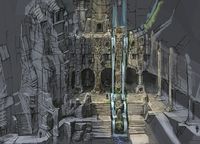
Understone Keep concept art

